In this short tutorial, we will show how easy it is to integrate Selenium to the tests generated from Hiptest. In order to reach as many people as possible, we will use Java as the export language, but it should work the same with any of the languages that are supported by Selenium. To keep it simple, we will just use Google as the system under test, so we will not need to setup an application.
Prerequisite
You will need a few tools installed to get through this tutorial:
- Java (at least version 7)
- Maven
- Firefox (tested with version 41.0.2)
- An Hiptest account
Setting up the project in Hiptest
Create a new project in Hiptest, called "Selenium Tutorial ":

Go to the project settings and turn the BDD mode on:

Create a new scenario "Finding a site on Google " that will describe the behavior we want to test: when typing "Hiptest" in Google, the application website is shown in the results:

When you write the steps, do not forget to add quotes around "Google", "Hiptest" and "Hiptest: Agile test management tool & behavior driven development". This way, the system will create action words with parameters and you will be able to use those for other tests (using another search engine, searching another site, etc.).
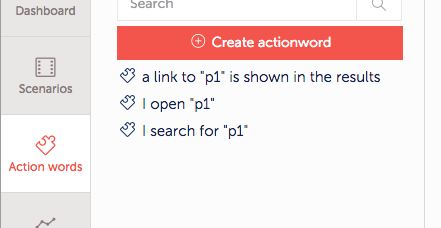
If you go to the action words list, you should see the 3 action words previously created:
Your project is now ready to be automated using Selenium Webdriver.
Getting the base project
Download the zip archive of this project and extract it (or clone it from the Github project of this tutorial).
Fetching code from Hiptest content
To speed up this tutorial, we will skip the installation of hiptest-publisher and use the service version provided inside Hiptest to get the skeleton of your test.
Open the "automation" tab of the project then click on the Java/JUnit link:
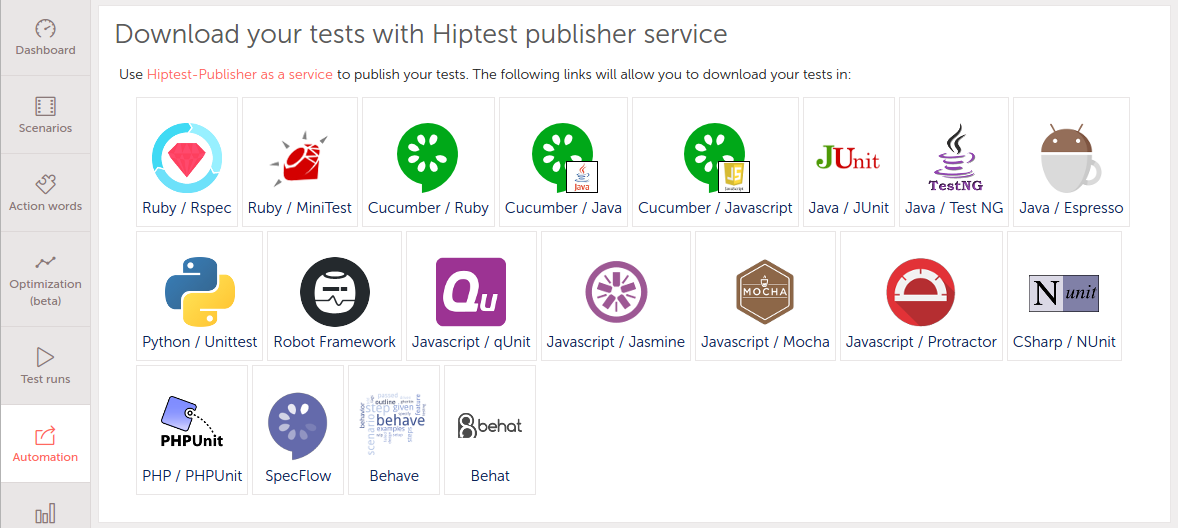
You should get a zip file containing two files: one for the test (ProjectTest.java) and one for the action words (Actionwords.java). Copy both of these files and paste them in the base project you obtained previously, in the sub-directory "src/test/java/com/example/".
You might notice a third file (actionwords_signature.yaml) in the archive, but we will not discuss it in this tutorial, so you do not have to copy it.
Now, open a terminal, go to the root of the project and run "mvn test". Everything should work fine and you should get a "Build successful" message. However, the test has not been really run, because we have not implemented it. Let's fix this.

Implementing the action words
Let's have a look at our two files. The first one (ProjectTest.java) will contain the test we wrote previously in Hiptest:
package com.example;import junit.framework.TestCase;
public class ProjectTest extends TestCase {
public Actionwords actionwords = new Actionwords();
public void testFindingASiteOnGoogle() {
actionwords.iOpenP1("http://google.com");
actionwords.iSearchForP1("Hiptest");
actionwords.aLinkToP1IsShownInTheResults("Hiptest: Agile test " +
"management tool & behavior driven development");
}
}
Good news: you don't have to change anything to this file. Actually it is a good habit to never manually update the test file, as this would create differences between the implemented version which is in your code repository and the reference version stored in your Hiptest project. So close it and switch to the "Actionwords.java" file:
package com.example;public class Actionwords {
public void iOpenP1(String p1) { }
public void iSearchForP1(String p1) { }
public void aLinkToP1IsShownInTheResults(String p1) { }}
As you can see, the code is pretty empty and does not contain any references to Selenium. The first thing to do is to add the packages we need from Selenium. Below "package com.example", add the following lines:
import org.openqa.selenium.WebDriver;import org.openqa.selenium.firefox.FirefoxDriver;
import org.openqa.selenium.By;
import org.openqa.selenium.WebElement;
import org.openqa.selenium.support.ui.WebDriverWait;
import org.openqa.selenium.support.ui.ExpectedCondition;
The second thing we will need to do is to get an access to the browser from the "Actionwords" class. We will create an instance of the driver object in the constructor. Just after the line "public class Actionwords", add the following code:
private WebDriver driver;Actionwords() {
driver = new FirefoxDriver();
}
Now, if you run the tests again (using "mvn test"), you should see a Firefox window opening.
We're almost done. We just have to fill the code of each action word.
Our first action word (iOpenP1) is supposed to tell the driver to open a web site. That's pretty easy to do:
public void iOpenP1(String p1) { driver.get(p1);
}
The second action word will run the search. To do so, we will find the search input on the Google homepage (which is named "q"), clear the text that might be there, fill it with our own query and submit the form.
public void iSearchForP1(String p1) { WebElement element = driver.findElement(By.name("q"));
element.clear();
element.sendKeys(p1);
element.submit();
}
The last action word to implement will ensure that Hiptest appears in the search results. The test runner will wait until a link with the correct name appears in the page. If the link with the correct name is not found, an error will be raised and the test will fail.
public void aLinkToP1IsShownInTheResults(String p1) { final String matcher = p1;
(new WebDriverWait(driver, 10)).until(new ExpectedCondition<Boolean>() {
public Boolean apply(WebDriver d) {
return d.findElements(By.linkText(matcher)).size() != 0;
}
});
}
Now run the tests again and you should see a Firefox windows open and the steps of the test be run in front of you.
Forewords and conclusion
As you can see, integrating Selenium Webdriver to automate your tests is pretty simple and it takes only a few minutes to get an integration test running (as long as the Maven configuration is already there).
There is still some areas we have not covered during this short tutorial, but we'll explain them in later blog posts:
- how to use hiptest-publisher instead of the service version to handle updates in the scenarios and action words
- how to customize the output of the test code