The purpose of this tutorial is to explain how to automate your Hiptest tests and get the results of their execution back into it. Also, you will see how it is possible to integrate Hiptest in a continuous integration process.
We are going to see how to:
- Write test scenarios in Hiptest
- Generate test scripts in Java with JUnit 3.8.1
- Automate the steps of your tests
- Execute test scripts
- Push test execution results into Hiptest
- Configure the continuous integration (CI) server
To illustrate this process, we will use the coffee machine sample as system under test (SUT). The SUT is a simple coffee machine. You start it, you ask for a coffee and you get it.
Prerequisite
You will need to install a few tools to get through this tutorial:
Setting up the project in Hiptest
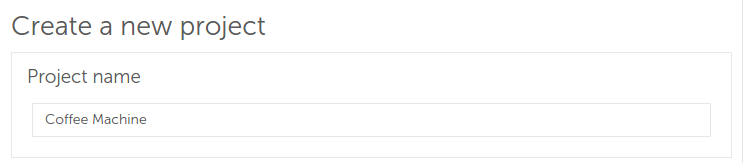
Create a new project in Hiptest called "Coffee Machine":
As we will use the BDD style to write the tests, go to the project settings and turn BDD mode on:

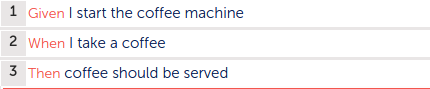
Create a new scenario "Simple use" that will describe the behavior we want to test: when I take a coffee then coffee should be served. Read this documentation to have more information on writing a scenario with the Gherkin syntax.
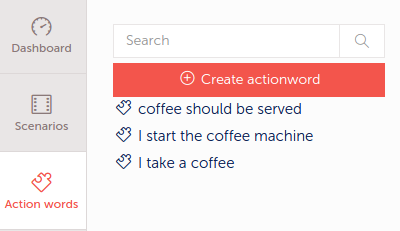
If you get to the action words list, you should see that 3 action words have been created:
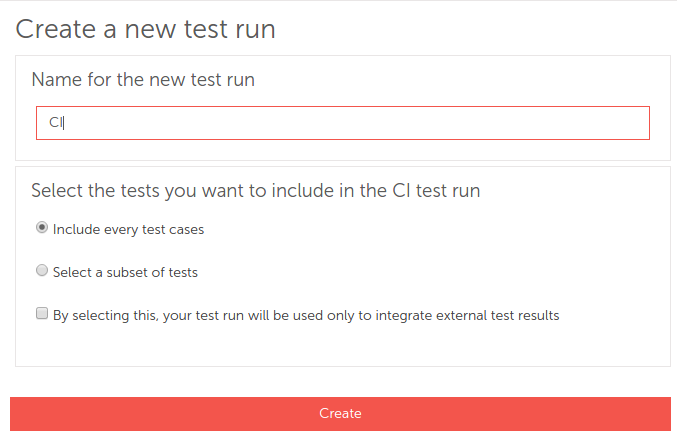
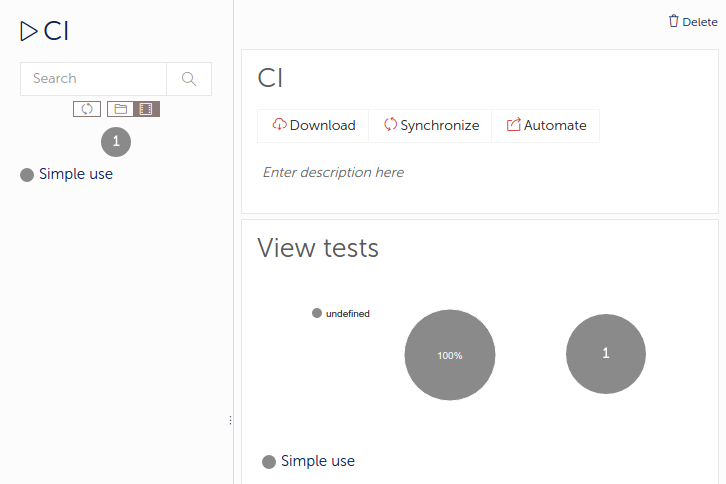
As we want the continuous integration server pushes the test execution results in Hiptest, create a new test run called "CI":
Open the CI test run. Of course the only present test result is undefined as the test has not been executed yet.

Create the Java project of the SUT
Now, you will need to create the Java project of the SUT. Use this Maven command line to create it:
mvn archetype:generate -DgroupId=com.coffeemachine -DartifactId=coffee-machine -DarchetypeArtifactId=maven-archetype-quickstart -DinteractiveMode=false
This command generates the directory 'coffee-machine' with sample files and pom.xml. Replace the file src/main/java/com/coffeemachine/App.java by the file CoffeeMachine.java with its implementation. Basically, you will need two functions: a first one that start the machine and an other one that serve a coffee if the machine is started:
package com.coffeemachine;public class CoffeeMachine {
private boolean started = false;
public boolean coffeeServed = false;
public void start() {
started = true;
}
public void takeCoffee() {
if (started) {
coffeeServed = true;
}
}
}
You can also remove the file src/test/java/com/coffeemachine/AppTest.java
Generate test script from Hiptest test run
To generate test scripts in your favorite language, you have to use the hiptest-publisher. It downloads an xml export of the tests and convert it into test scripts. You can find a documentation here about the installation and the usage of hiptest-publisher.
The simplest way to use it is to use a configuration file to save your preferences. You can download a predefined one in the "Automation" tab of your Hiptest project:
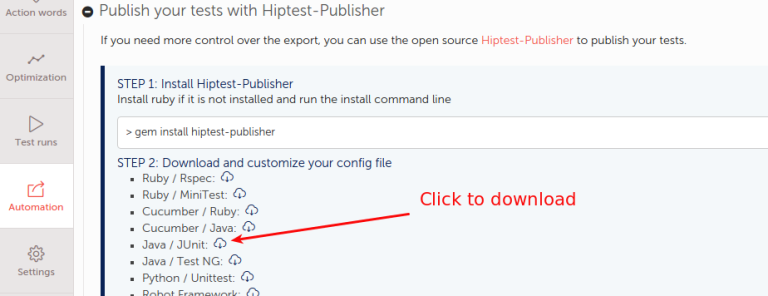
Save this file in the folder coffee-machine. You can see that this file already contains some configuration lines:
token = '10184946507268169441997424136986232959...'language = java
output_directory = './'
package = 'com.example'
The token allows you to identify your Hiptest project. You can also find it in the settings page.

The language property is set on java but, according to your project, you can choose another language. See in the "Automation" tab what languages are available or run command line hiptest-publisher --languages-help. Update the output_directory property to define the place where to generate the test scripts. Update the package property to adapt it to the coffee-machine project.
output_directory = './src/test/java/com/coffeemachine'package = 'com.coffeemachine'
The configuration file is now ready. You can now use it with the hiptest-publisher. First, check it is well installed, by running this command line:
hiptest-publisher --version
If it's ok, you can generate the test scripts from the coffee-machine directory with the command:
hiptest-publisher -c hiptest-publisher.config
The console should display something like this:

Three files have been generated. The file ProjectTest.java contains the test "Simple Use", in JUnit format:
package com.coffeemachine;import junit.framework.TestCase;
public class ProjectTest extends TestCase {
public Actionwords actionwords = new Actionwords();
public void testSimpleUse() {
// Given I start the coffee machine
actionwords.iStartTheCoffeeMachine();
// When I take a coffee
actionwords.iTakeACoffee();
// Then coffee should be served
actionwords.coffeeShouldBeServed();
}
}
Good news: you won't have to change anything to this file. Actually it is a good habit to never manually update the test files, as this would create differences between the implemented version which is in your code repository and the reference version stored in your Hiptest project. So close it and switch to the Actionwords.java file:
package com.coffeemachine;public class Actionwords {
public void iStartTheCoffeeMachine() {}
public void iTakeACoffee() {}
public void coffeeShouldBeServed() {}
}
As you can see, the code is pretty empty and you need to add the calls to the SUT.
package com.coffeemachine;
import junit.framework.Assert;
public class Actionwords { public CoffeeMachine sut = new CoffeeMachine();
public void iStartTheCoffeeMachine() {sut.start();
} public void iTakeACoffee() {
sut.takeCoffee();
} public void coffeeShouldBeServed() {
Assert.assertTrue(sut.coffeeServed);
}}
Next, run test script with command:
mvn package
Your tests should pass. Now, it's time to push the result of the execution back to Hiptest.
Push the test execution result into Hiptest test run
In common cases, you will not push the execution results manually to Hiptest, as this is the role of the CI server. But for this tutorial, we will manually play the role of the CI server before the real setup to make you understand the process.
You will find the test execution report file in target/surefire-reports/TEST-com.coffeemachine.ProjectTest.xml. To push the result to Hiptest, go to your CI test and click on the "Plus > Automate" menu:

Copy the third command line (you can do it by clicking the clip board icon on the right), paste it to your terminal and update the needed fields (path to config file and path the to report file). The command should look like this:
hiptest-publisher -c hiptest-publisher.config -p target/surefire-reports/TEST-com.coffeemachine.ProjectTest.xml --test-run-id=XXX --push-format junit
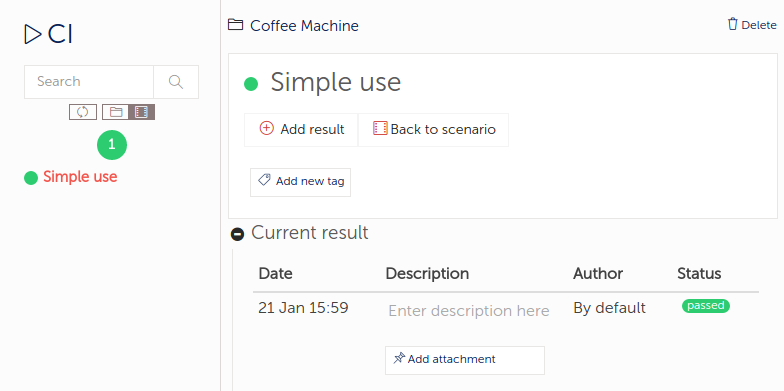
You can now return to Hiptest and see the test "Simple use" has a new passed result.
You can play and add a failure in the test, replay it and push it again:
> mvn package> hiptest-publisher -c hiptest-publisher.config -p target/surefire-reports/TEST-com.coffeemachine.ProjectTest.xml --test-run-id=XXX --push-format junit
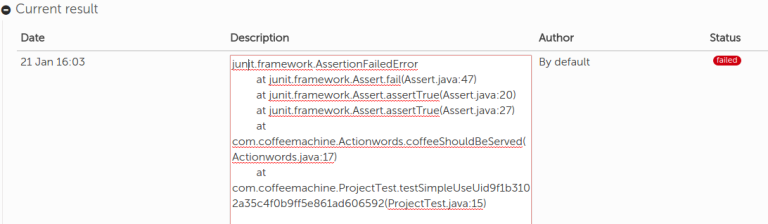
This time, the new test result is failed and the description contains the stacktrace of the error.
Configure CI
When you automate your Hiptest tests, you need to push the hiptest-publisher.config and the ActionWords.java into your VCS. The test script file(s) are not mandatory as they can be regenerated.
You need to have Ruby and hiptest-publisher installed on the CI slaves.
At this point, your CI server should already be able to get the code from your VCS and run the tests. You just need to update its configuration to generate tests from Hiptest and to push the results back into it after the test execution.
Once again, those command lines can be found in the "Plus > Automate" menu of the test run:
For example:
> git pull origin master> hiptest-publisher -c hiptest-publisher.config --without=actionwords --test-run-id=XXX
> mvn package
> hiptest-publisher -c hiptest-publisher.config -p target/surefire-reports/TEST-com.coffeemachine.ProjectTest.xml --test-run-id=XXXX --push-format junit
Here, only the tests are generated from Hiptest, the action words file comes from the VCS.
You can play with a complete sample of the coffee machine in this repository. The file .travis.yml contains a build configuration for Travis-CI.
Conclusion
In this tutorial, you learned how to generate test scripts from your Hiptest tests and how to automate them by implementing the action words. You also executed them and pushed the results of this execution in a Hiptest test run, and got some clues to integrate this workflow in your CI process.
To go further, you can take a look at the hiptest-publisher documentation. For instance, this page explains the usage of the third generated file and how to easily upgrade the action word implementation.