We received a lot of requests from our users to help them to integrate Appium with Hiptest. For those who don't know it, Appium is a test automation framework used for mobile testing and designed to work with any types of mobile application (native, web or hybrid, on iOs or Android) and compatible with multiple languages and test frameworks.
Because its philosophy, we couldn't have provided a simple Appium export built in the hiptest-publisher, so that's why we've decided to write this post to help you to setup your technical environment, based on the same model than our previous post about Calabash integration. As for this last post, we are going to write an acceptance test for the Android Wikipedia application, and automate it with Ruby and the RSpec framework.
So. Allons-y!
Prerequisite
Before all, you will need:
- A Hiptest account
- The hiptest-publisher
- The apk of your app (you can find Wikipedia's with a few searches, given it's free and open source)
- A proper installed Android SDK and a working and running virtual device
- A Ruby install (with Bundle)
- And of course, Appium (check the install process at the bottom of this page)
Setup your project
Gemfile
Create a new directory and move your apk file in it. Then, create a Gemfile and add these gems:
source 'https://www.rubygems.org'ruby '2.2.4'
gem 'appium_console'
gem 'appium_lib'
gem 'rest-client'
gem 'rspec'
gem 'rspec-expectations'
gem 'spec'
gem 'test-unit'
gem 'pry'
Run "bundle install" in the directory and it's done.
Appium console
The Appium console (or Arc) allows you to drive a device (virtual or not) by using the Ruby Appium library API. We are going to use it to experiment instructions that will be later part of our automation scripts.
After running Bundle, create a file named "appium.txt" in your directory. Open it and fill it with this content:
[caps]platformName = "Android"
deviceName = "Android Emulator"
app = "/path/to/your_app.apk"
appActivity = ".myMainActivity"
appPackage = "my.app.package"
Now, launch your virtual device with the Android emulator and an Appium server (simply type the command line "appium"), then run the "arc" command. The apk will be installed on the virtual device and launched, and a Ruby prompt will be displayed, ready to receive your orders :)
Rspec
Now, run "rspec --init" from the command line to create the basic files used to run your RSpec test suite. A file named "spec_helper.rb" will be created. Fill it like this:
require 'rubygems'require 'rspec'
require 'rspec/expectations'
require 'appium_lib'
RSpec.configure do |config|
config.before(:all) do
appium_txt = File.join(Dir.pwd, 'appium.txt')
caps = Appium.load_appium_txt file: appium_txt
@driver = Appium::Driver.new(caps).start_driver
@driver.manage.timeouts.implicit_wait = 30
@wait = Selenium::WebDriver::Wait.new :timeout => 30
Appium.promote_appium_methods Object
end
config.after(:each) do
@driver.reset
end
config.after(:all) do
@driver.driver_quit
end
end
We will run the test execution with the same Appium capabilities (you can find the whole list here) than for the console, but nothing prevents you to use another configuration. Also, we create here an instance of the Appium driver and an instance of the wait object, to have more control on the elements displayed on the screen.
Now that the setup is done, we are ready to write our test!
Write and automate your test scripts with Hiptest
Write the test
We are going to validate the History feature of the Wikipedia mobile app. First, log in to Hiptest, create a new project and create a new scenario. Then, just write your test steps:

As you can see, the scenario is written using the Gherkin syntax for a better readibility. If you want to do so, activate the BDD mode in the project settings.
Get the executable script
Go to the automation panel of your project, head to the "Publish your tests with Hiptest-Publisher" section and get your Ruby/RSpec config file:
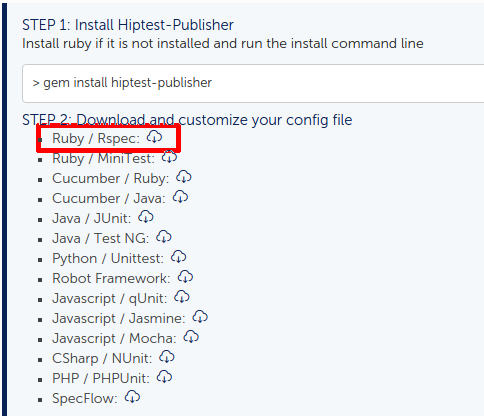
Move the "hiptest-publisher.config" file into your directory, then run:
hiptest-publisher --config hiptest-publisher.config --output-directory spec
You'll get three files, but only two interested us here: "project_spec.rb" and "actionwords.rb". If you open the first one, you'll see your scenario converted into a RSpec test case. Its definition is only constituted of methods calls that match the scenario steps. Actually, you won't ever need to modify this file.
To automate the execution of the test, we are going to implement the steps defined as Ruby methods in the actionwords.rb file.
- Brace yourself, you are going to assist to an unique and totally mastered transition to the next part-
Let's open this file and...

Use the Appium Ruby library to automate the script
That's where we are going to give instructions to Appium to make it interact with our app and write the assertions that will leave us sure that everything is working as well as expected.
Use contexts
I picked Wikipedia app also because it's a hybrid app, which means that some parts are coded in the native Android language (widget like the search bar) and others are simple web views displayed in a container (basically, the articles pages).
Appium provides the notion of contexts to make you able to interact with the both kinds of GUI components. All you have to do is to switch between those contexts depending of with which one you want to interact or make assertion on.
To list the contexts of your app, launch the Appium console and run "available_contexts":
[1] pry(main)> available_contexts[
[0] "NATIVE_APP",
[1] "WEBVIEW_org.wikipedia"
]
You can then switch from one context to another with "set_context":
# switch to native context[2] pry(main)> set_context "NATIVE_APP"
# switch to webview context
[3] pry(main)> set_context "WEBVIEW_org.wikipedia"
Based on this, I wrote two test helpers to easily switch between the two contexts during automation process:
module DriverHelper def switch_to_native_context
@driver.set_context "NATIVE_APP"
end
def switch_to_webview_context
@driver.set_context "WEBVIEW_org.wikipedia"
end
end
(Don't forget to include this module in your RSpec config)
A first step automation
Let's have a glance to the first step of our scenario, "app_opened_as_unregistered_user". I just want to be sure that the app is opened and display the Home page (the "Today's featured article").
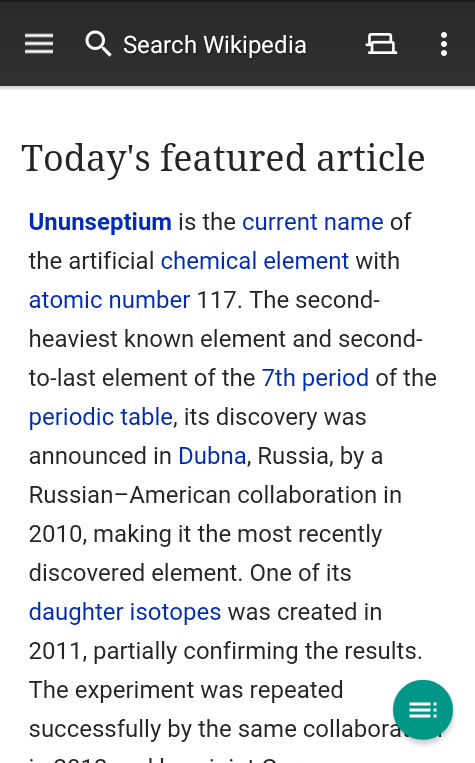
Wikipedia Home Page
Appium library provides a "find" method that can find widgets in the GUI of your app. So we are going to check if the title "Today's featured article" appeared when we open the app to automate the first step of the scenario. To inspect a Webview, use Google Chrome and its devices inspector feature (look there).
def app_opened_as_unregistered_user # we are checking something in the webview
switch_to_webview_context
h2s = find_elements :tag_name, "h2"
expect(h2s.first.text).to eq "Today's featured article"
end
Run your Rspec suite. The test should succeed.
You just automated your first step written in Hiptest with Appium!
You can repeat this process to implement the remaining steps. Here is the complete actionwords script available for download.
Going further
We just saw here a basic setup of an automated test execution with Appium. You will surely execute your tests on multiple platforms at the same time to ensure that their app is working on every device. To do that, some tools exist like SauceLabs (who sponsors Appium) or TestObject.